Spectacular Tips About What Is The Maximum PWM Speed For Arduino

PWM Working Principle Pulse Width Modulation How It Works Motor
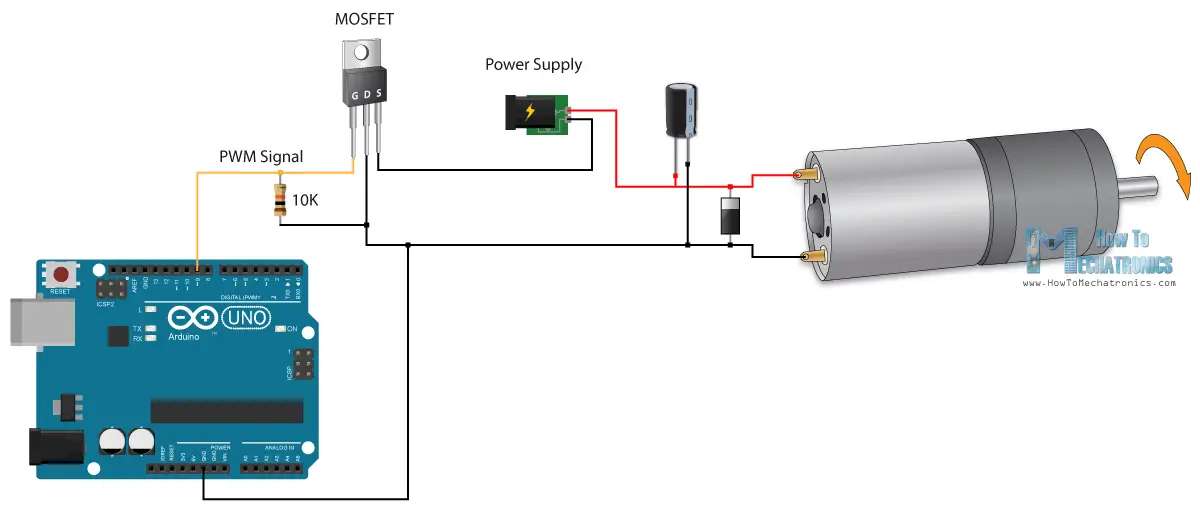
Decoding PWM Speed on Your Arduino
1. Understanding Pulse Width Modulation (PWM)
So, you're diving into the world of Arduino and want to control things like motor speeds, LED brightness, or even servo positions with finesse? PWM, or Pulse Width Modulation, is your golden ticket. It's essentially a clever way to mimic analog signals using digital outputs. Instead of sending a continuous 'on' or 'off' signal, PWM rapidly switches between the two, creating a pulsed wave. The magic lies in the "duty cycle," which is the percentage of time the signal is 'on' during each cycle.
A higher duty cycle means the signal is 'on' for a longer portion of the cycle, resulting in more power delivered to your device. Think of it like this: if you're dimming an LED, a higher duty cycle will make it brighter. Arduino boards typically offer several pins that can be configured for PWM output, denoted by a tilde (~) symbol next to the pin number. These pins have specialized hardware built-in to handle the rapid switching needed for PWM.
But how fast can we make these pulses? Thats where understanding the maximum PWM speed for Arduino comes in. It's crucial for optimizing performance, especially when you're driving sensitive components. Push it too hard, and you might get unexpected behavior, like flickering LEDs or erratic motor control. Get it just right, and you'll unlock a whole new level of control over your projects.
It all boils down to frequency. PWM frequency determines how many times the signal cycles 'on' and 'off' per second. Higher frequencies can lead to smoother control and less noticeable flickering, but they also come with certain limitations we'll delve into shortly.
2. Delving Into Frequency & Resolution
Let's get technical for a moment, but don't worry, we'll keep it friendly. The default PWM frequency on most Arduino pins is around 490 Hz or 980 Hz. Why those specific numbers? It's all tied to the Arduino's internal timers, which are responsible for generating the PWM signal. These timers divide the system clock frequency (usually 16 MHz) to create the PWM frequency. The specific divisor determines the frequency you get.
Now, about resolution. The Arduino's `analogWrite()` function, which you'll use to control PWM, offers a resolution of 8 bits. That means you have 256 discrete levels (from 0 to 255) to control the duty cycle. Think of it as having 256 shades of gray between black and white. A higher resolution would give you even finer control, but the Arduino Uno is limited to 8 bits using `analogWrite()` by default.
The relationship between PWM frequency and resolution is a bit of a balancing act. Increasing the frequency might seem like a good idea to reduce flicker, but it can sometimes come at the cost of resolution. This is because some techniques for increasing PWM frequency involve reducing the number of available duty cycle steps. So, it's crucial to understand these trade-offs to achieve the desired performance for your specific application. Essentially, finding the sweet spot between frequency and resolution is key to optimizing your PWM settings.
For instance, imagine trying to control the brightness of an LED. If you drastically increase the PWM frequency while sacrificing resolution, you might find that the dimming becomes stepped and less smooth. On the other hand, a low frequency could result in noticeable flickering. Finding that balance, where the dimming is smooth and the flicker is imperceptible, is the goal.
3. Maximum PWM Speed for Arduino
This is the core question, isn't it? What's the absolute fastest PWM frequency you can achieve on an Arduino? Well, there's no single definitive answer because it depends on your specific Arduino board and the methods you're willing to use. However, we can explore some general guidelines and techniques.
As mentioned earlier, the default PWM frequencies are typically around 490 Hz or 980 Hz. But with some tweaking, you can push these frequencies much higher. The Arduino's timers offer flexibility in how they're configured, allowing you to change the clock divisors and achieve different PWM frequencies. Be warned, however, that messing with the timers directly can have unintended consequences if you're not careful. You might affect other functions that rely on the same timers, such as `millis()` or `delay()`. So, proceed with caution!
One common technique for increasing PWM frequency is to directly manipulate the timer registers. This involves writing specific values to registers that control the timer's behavior. While this provides more control over the PWM frequency, it also requires a deeper understanding of the Arduino's hardware architecture. There are plenty of resources and tutorials online that can guide you through this process, but it's essential to understand the risks involved. Incorrect register settings can lead to unpredictable behavior or even damage your Arduino.
In practice, PWM frequencies up to several kilohertz (kHz) are achievable on many Arduino boards. However, as you increase the frequency, you might need to adjust other parameters, such as the prescaler value or the timer mode, to maintain a reasonable resolution. Furthermore, the performance of your circuit may be limited by the switching speed of the components you're controlling. For instance, some MOSFETs might not switch fast enough to accurately reproduce a high-frequency PWM signal.
4. Practical Implications and Considerations
Okay, so we know how to potentially increase the PWM frequency. But why would you even want to? Well, the benefits can vary depending on your application. For example, when controlling a DC motor, a higher PWM frequency can reduce audible noise and improve the smoothness of the motor's rotation. Similarly, when driving LEDs, a higher frequency can minimize or eliminate any noticeable flickering.
However, there are also downsides to consider. As mentioned earlier, increasing the PWM frequency can sometimes reduce the effective resolution of your PWM signal. This means you'll have fewer discrete levels to control the duty cycle, potentially leading to coarser adjustments. Another consideration is the switching speed of the load you're controlling. Some devices, such as large inductive loads, may not respond well to very high PWM frequencies.
Furthermore, increased PWM frequencies can sometimes lead to higher power consumption and increased electromagnetic interference (EMI). This is because the Arduino's output pins are switching on and off more rapidly, generating more high-frequency noise. In sensitive applications, you might need to add filtering circuitry to mitigate these effects. Always consider the broader impact of your PWM settings on the overall system performance and stability.
Think of a scenario where you're controlling a servo motor. While a higher PWM frequency might seem like a good idea, servos are often designed to operate within a specific frequency range. Exceeding this range could lead to erratic behavior or even damage the servo. Therefore, it's crucial to consult the datasheet of your specific component and choose PWM settings that are compatible with its operating characteristics.
5. Tweaking PWM Frequency
Alright, let's get our hands dirty with some actual code. Remember, directly manipulating timer registers can be risky if you don't fully understand what you're doing, so proceed with caution! But here's an example of how you might increase the PWM frequency on pins 9 and 10 of an Arduino Uno (which are controlled by Timer1):
void setup() { // Set Timer1 to Fast PWM mode, 62.5 kHz frequency TCCR1A = _BV(WGM11) | _BV(COM1A1) | _BV(COM1B1); TCCR1B = _BV(WGM13) | _BV(WGM12) | _BV(CS10); // No prescaler}void loop() { analogWrite(9, 128); // Set duty cycle to 50% on pin 9 analogWrite(10, 64); // Set duty cycle to 25% on pin 10 delay(100);}In this code, we're directly manipulating the `TCCR1A` and `TCCR1B` registers to configure Timer1 for Fast PWM mode with a frequency of approximately 62.5 kHz. The `COM1A1` and `COM1B1` bits enable PWM output on pins 9 and 10. The `CS10` bit sets the prescaler to 1 (no prescaling), which results in the highest possible frequency.
Keep in mind that this code snippet is specific to the Arduino Uno and the Timer1 peripheral. Different Arduino boards and timers will have different register names and configurations. Always consult the Arduino documentation and the datasheet of your microcontroller for the correct settings. And remember to test your code thoroughly before deploying it in a critical application. A small mistake in the register settings can lead to unexpected behavior.
Before implementing this code, consider making a backup of your existing code and hardware configuration. This will allow you to easily revert to a previous state if something goes wrong. Additionally, monitor the behavior of your Arduino and any connected components carefully. If you notice any signs of instability, overheating, or erratic behavior, immediately disconnect the power and troubleshoot the issue.


Duda Sobre PWM En Arduino Software Forum

Arduino Pwm Modulation Surveyshery
